To build an event marketing schedule, fix your event date, count backward in phases, and list every promotional task with a due date, a channel, an owner, and a result you will measure. Split the list into three blocks: pre-event promotion, event-day promotion, and post-event follow-up. Then review it every week. That is the whole method, and the rest of this guide shows you how to do each part.
Most schedules fail in predictable ways. They start too late, so the announcement lands six weeks out for an event that needed four months. They list ideas without dates, so posting happens whenever someone remembers. Or they stop at doors open, and the leads, photos, and goodwill from the event go cold within days. A schedule that covers all three blocks fixes each of these problems.
Exhibition Globe covers trade shows, exhibitions, and conferences, and we publish announcements from the organizers who run them, so this guide leans toward B2B events. The method works for any event, though. You will set a goal and an anchor date, build the pre-event countdown, plan event day and the weeks after, assign owners and a budget, and finish with a template you can copy into a spreadsheet and adapt.
What an event marketing schedule includes
An event marketing schedule is a dated list of promotional tasks that runs from your first announcement to your last follow-up email. Add owners, budgets, and results to that list and you have an event marketing planner. Both come from the same document, so build the schedule first and extend it.
Schedule, plan, and planner compared
People use these three terms loosely, and the confusion costs time. Each document answers a different question, and you need to know which one you are building.
| Document | Question it answers | What it contains |
|---|---|---|
| Event marketing plan | Why and for whom? | Goals, audience, key messages, channel strategy |
| Event marketing schedule | When? | Tasks in order with due dates, grouped by phase |
| Event marketing planner | Who and how much? | The schedule plus owners, budget, status, and KPIs |
For most teams, one spreadsheet does all three jobs. Keep the strategy notes on a separate tab and let the schedule tab carry the dates, owners, and status.
Gather five inputs before you list a task
Missing inputs are the main reason schedules get rewritten halfway through. Collect these five before you open a blank sheet:
- Event date, length, and format: in-person, virtual, or hybrid.
- One primary goal with a number: registrations, attendees, booth sales, or qualified leads.
- Two or three audience segments: past attendees, new prospects, exhibitors, and sponsors are typical.
- A budget, including how much you can spend on paid promotion.
- Your channels and assets: email list size, social accounts, website, partners, and media contacts.
If you do not know your budget, you cannot decide whether paid ads belong in the second phase. Get a rough answer to every item first. A rough number you can adjust is better than a blank cell that stalls the whole schedule.
A schedule without dates and owners is only a wish list.
Step 1. Set your goal and anchor date
Your anchor date is the first day of the event, and your goal is the number that tells you whether the schedule worked. Set both before anything else, because every other date in the schedule is counted back from the anchor.
Turn the goal into a registration target
Start with the outcome you need, then work backward through the funnel. If you need 1,000 attendees and expect about 65% of registrants to show up, you need roughly 1,539 registrations. If your event page converts 5% of its visitors, that means about 30,800 visits to the page. Treat the 65% and 5% as placeholders and replace them with your last event’s numbers. A free virtual event usually loses more registrants than a paid in-person show.
This arithmetic tells you how much traffic your channels must deliver. That decides how much email, social, paid, and partner promotion the schedule has to contain, and it keeps you from filling the calendar with posts that cannot reach the target.
Count back from the anchor date
How far back you count depends on the event. These ranges are starting points drawn from common practice, and your own registration history should override them.
| Event type | Start visible promotion | Note |
|---|---|---|
| Webinar or workshop | 3 to 4 weeks before | Compress the phases and send one email a week |
| One-day conference | 8 to 12 weeks before | Announce speakers early |
| Multi-day conference | 12 to 20 weeks before | Add a sponsor promotion track |
| Trade show or exhibition | 14 to 26 weeks before | Exhibitor recruitment starts even earlier |
Then check the calendar for constraints: your early-bird deadline, public holidays, and any date a partner or media outlet needs material. Take a two-day trade show that opens on Wednesday, April 14, 2027. A 16-week runway would start on December 23, in the middle of the holiday season, when marketing emails get ignored. Move the launch to Wednesday, January 6, which gives you 14 weeks and a clean start. Every dated example below uses that anchor.
Pick the anchor date first, because every other date is counted back from it.
Step 2. Build the pre-event timeline
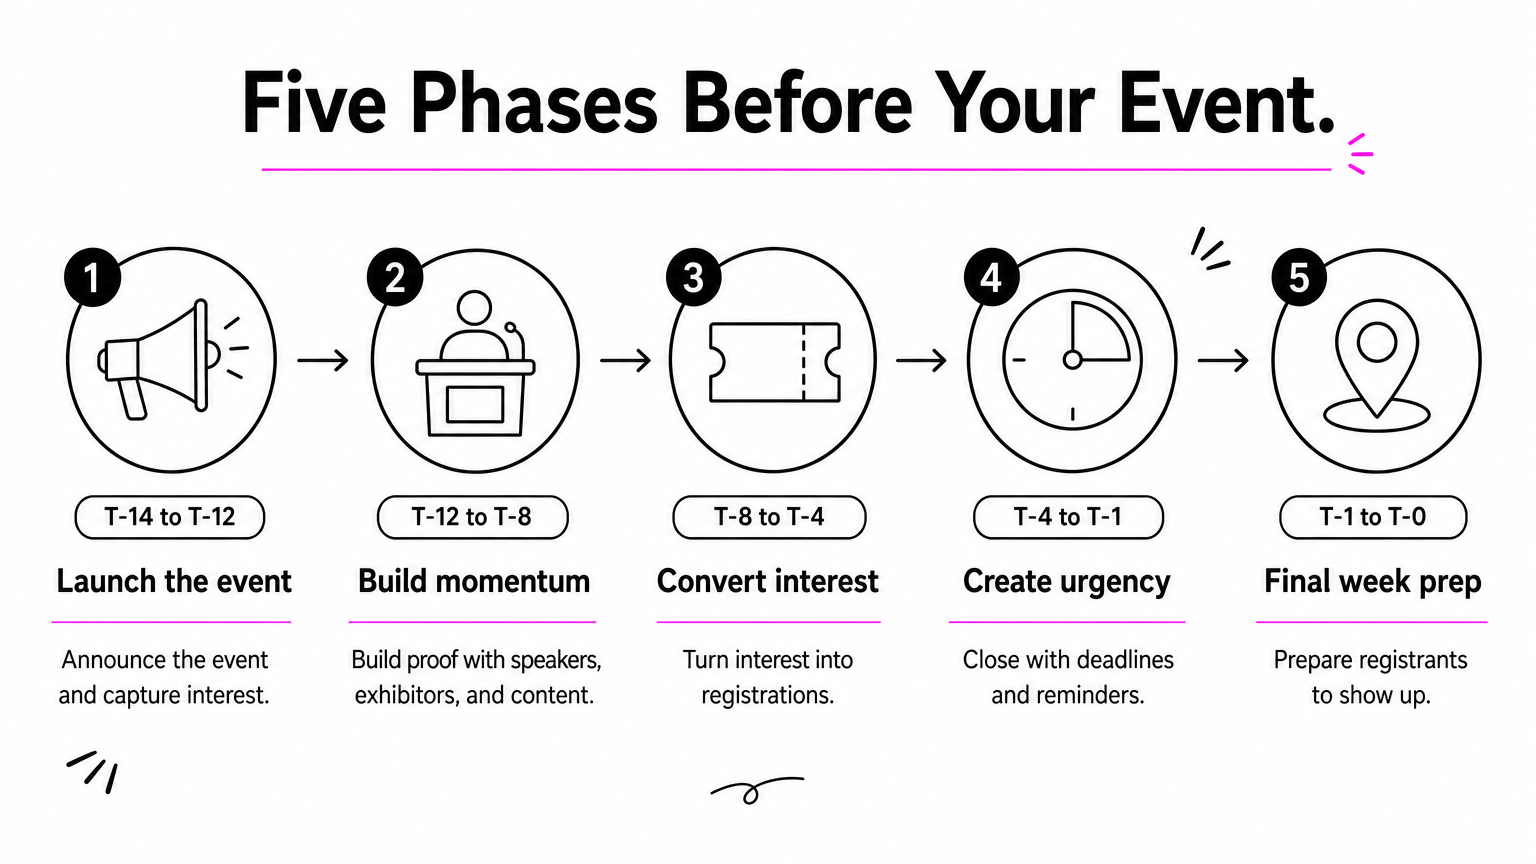
Divide the weeks before the event into five phases and give each phase one job: launch, momentum, conversion, urgency, and final week. Phases stop you from sending the same message for 14 weeks, and they make the schedule easy to scan.
The five phases at a glance
Use "T-minus" labels, where T-8 means eight weeks before the event starts. The table pairs each window with the dates from the April 14, 2027 example.
| Phase | Window | Example dates | Job |
|---|---|---|---|
| 1. Launch | T-14 to T-12 | Jan 6 to Jan 19 | Announce the event and capture interest |
| 2. Momentum | T-12 to T-8 | Jan 20 to Feb 16 | Build proof with speakers, exhibitors, and content |
| 3. Convert | T-8 to T-4 | Feb 17 to Mar 16 | Turn interest into registrations |
| 4. Urgency | T-4 to T-1 | Mar 17 to Apr 6 | Close with deadlines and reminders |
| 5. Final week | T-1 to T-0 | Apr 7 to Apr 13 | Prepare registrants to show up |
In this example the early-bird deadline sits at T-8, on February 17, which is the start of the conversion phase. Phase five is the one most schedules skip. Registrants who get no logistics information are the ones who forget to come, so treat the final week as part of the marketing, not an operations task.
Tasks to place in each phase
Here is what belongs in each phase for a trade show or conference. Shorten or delete items for smaller events.
- Launch: publish the event page with registration, send a save-the-date to past attendees, issue a launch press release, add tracking links, and announce your first speakers or anchor exhibitors.
- Momentum: send partner and exhibitor promotion kits (logo, short copy, link), publish preview articles or short videos, and start paid campaigns aimed at past visitors and lookalike audiences.
- Convert: run the early-bird deadline emails, publish the agenda or show guide, share photos and testimonials from past editions, and retarget people who visited the registration page but did not register.
- Urgency: issue a second press release, send last-chance emails, post countdowns, and ask exhibitors to invite their own customers.
- Final week: send a logistics email covering venue, transport, hours, and badge pickup, schedule event-day posts, and brief your team.
Trade media is the channel organizers underuse. A press release at launch and another around T-3 gives industry readers two reasons to notice your event. We publish organizer press releases on Exhibition Globe, and our Press Release service is priced at Rs. 15,000.
Give every phase one job, and your messages will stop repeating themselves.
Set an email cadence that matches the phase
Email carries the most weight in a B2B schedule, so give it its own rhythm. In phases one and two, send one email every two weeks. In phases three and four, move to weekly. In the final three days, send one short reminder a day to registrants only.
Segment before you send. Keep at least three lists: past attendees, new prospects, and registrants. Past attendees get a "welcome back" message with what has changed. Prospects get proof, such as speakers, exhibitors, and the agenda. Registrants get logistics and a reason to bring a colleague. Never send registration appeals to people who have already registered.
Step 3. Schedule event-day promotion
Event-day promotion means planning, by the hour, the posts, messages, and on-site prompts that keep attendees engaged and reach the people who stayed home. Decide who posts what, and when, before the doors open.
Plan the day in time blocks
Build the day as a short table in your schedule. This one fits a typical trade show day, and you can adjust the clock times to your program.
| Time block | Promotion task | Channel |
|---|---|---|
| Two hours before opening | Post directions, hours, and the live stream link | Social, email, or app message |
| At opening | Photo or short video of the first visitors, tagging exhibitors and sponsors | Social |
| Mid-morning | Highlight one session or demo with a quote card | LinkedIn and other social |
| Lunch | Share the afternoon agenda with a link | Social, event app |
| Closing | Thank visitors and tease tomorrow’s highlights | Social |
| Evening | Send a daily recap with photos and a preview of day two |
On a multi-day event, repeat the cycle each day. End the last day with a thank-you post, not a sales pitch. People who attended want recognition, and people who missed it want to see what they missed.
Prepare content before the doors open
Assign one person to own event-day content, and give that person no other job. A staff member who is also running registration will not post. Hand them a shot list (the opening moment, the keynote, the busiest aisle, a demo, a sponsor booth, a visitor quote), the event hashtag, and caption templates that are already approved, so nothing waits for sign-off.
Use on-site prompts to feed the next block of the schedule. Put a QR code at registration and at the exit that points to your newsletter or next-edition waitlist, and ask exhibitors to tag the event in their own posts. These small steps give your follow-up phase an audience before the event ends.
On event day, one person owns the content, and nothing waits for approval.
Step 4. Plan post-event follow-up
Post-event follow-up is where the schedule earns its return, so put it on the calendar before the event starts. Send a thank-you within 24 hours and a survey within 48, then spread the rest over six weeks.
The first 72 hours
Speed matters here, because attention fades within days. Schedule these tasks in advance:
- Within 24 hours: a thank-you email to attendees with a link to the photo gallery.
- Within 24 hours: a separate email to no-shows with slides or recordings, if you have them.
- Within 48 hours: a short survey of three to five questions, including one open-text question.
- Within 72 hours: a personal thank-you to exhibitors and sponsors, with preliminary attendance numbers.
Keep the survey short. A five-question survey sent while the event is fresh gets better answers than a long one sent a week later, and the answers feed your next schedule directly.
Weeks one to six
After the first three days, the work shifts from thanks to reuse and renewal. Each task below has a purpose, and each one belongs in the schedule from day one.
| When | Task | Purpose |
|---|---|---|
| T+1 week | Publish a recap article or video | Reuse content and reach people who did not attend |
| T+2 weeks | Send lead lists and sponsor or exhibitor reports | Prove value and prepare renewals |
| T+4 weeks | Review results against your goals and hold a debrief | Capture what to change |
| T+6 weeks | Open next-edition registration or a waitlist | Convert the momentum while it lasts |
Write the debrief into the calendar with a date and a guest list. Compare registrations, attendance, cost per registration, and survey scores with the targets you set in Step 1, and note which channel delivered the most registrations. Those notes become the first page of your next schedule.
Follow-up tasks that are not scheduled before the event usually never happen.
Step 5. Assign owners, budget, and tracking
Turn the schedule into an event marketing planner by adding four columns: owner, budget, status, and KPI. Every task gets one owner and one due date, and every phase gets a budget line.
One owner and one due date per task
Shared ownership means no ownership. Name one person per task, even when several people contribute, and add a status column with four values: Not started, In progress, Waiting for approval, and Done. Anything stuck in "Waiting for approval" for more than two days is a risk to flag in your weekly check.
Build in buffers for tasks that need sign-off. If a sponsor or legal team must approve copy, set the due date for the draft at least five working days before the publish date. Add that buffer to the schedule itself instead of trusting people to remember it.
Split the budget by risk
A 70/20/10 split is a practical way to divide marketing spend: 70% on channels that have already worked for you, 20% on channels you have partly tested, and 10% on experiments. Here is how it looks for a $10,000 marketing budget.
| Share | Amount | Example use |
|---|---|---|
| 70% | $7,000 | Retargeting, partner promotion, email tools, proven paid channels |
| 20% | $2,000 | A new ad audience or a new partner channel |
| 10% | $1,000 | One experiment, such as a short video series |
Your first event has no history, so the split will be rough. Record the result of each experiment, and the best one moves into the 70% next time.
Review the schedule every week
Spend 15 minutes each week comparing registrations with your pace. If you have a registration curve from the last event, use it. If you do not, set your own checkpoints, such as 30% of the goal at T-8 and 60% at T-4, and revise them after this event.
Check four numbers in that meeting:
- Registrations against the checkpoint.
- Registrations by source. Tag every link with UTM parameters so Google Analytics can attribute each registration to a channel.
- Email click rate by segment.
- Cost per registration for each paid channel.
When you are behind, move the next push earlier and strengthen the offer before you add new channels. Adding channels at random spreads a small budget thinner.
One owner, one date, and one number per task is what makes a schedule a planner.
Event marketing schedule template you can copy
The template below holds 25 tasks across the five pre-event phases, event day, and post-event. Copy it into Excel, Google Sheets, or a Word table, then fill in owners and dates.
Copy-and-paste template
Paste the block into the first cell of a blank sheet, then split the text into columns using the comma as the separator. In Word, paste it and convert the text to a table with the same separator.
Phase,Timing,Task,Channel,Owner,Due date,Status,KPI
Launch,T-14w,Publish event page with registration form,Website,,,Not started,Page live
Launch,T-14w,Send save-the-date to past attendees,Email,,,Not started,Click rate
Launch,T-14w,Issue launch press release,Trade media,,,Not started,Pickups
Launch,T-13w,Add tracking links and a registration source field,Analytics,,,Not started,Sources tagged
Launch,T-12w,Announce first speakers or anchor exhibitors,Social and email,,,Not started,Link clicks
Momentum,T-10w,Send partner and exhibitor promotion kit,Partners,,,Not started,Partner shares
Momentum,T-10w,Publish first preview article or video,Blog and social,,,Not started,Views
Momentum,T-9w,Start paid campaigns for past visitors and lookalikes,Paid ads,,,Not started,Cost per registration
Momentum,T-8w,Send early-bird deadline emails,Email,,,Not started,Registrations
Convert,T-6w,Publish agenda or show guide,Website and email,,,Not started,Page visits
Convert,T-5w,Share past-edition photos and testimonials,Social,,,Not started,Shares
Convert,T-4w,Launch retargeting ads to page visitors,Paid ads,,,Not started,Return visits
Urgency,T-3w,Issue second press release,Trade media,,,Not started,Pickups
Urgency,T-2w,Send last-chance registration email,Email,,,Not started,Registrations
Urgency,T-2w,Remind exhibitors to invite their customers,Partners,,,Not started,Referral registrations
Final week,T-1w,Send logistics email to registrants,Email,,,Not started,Open rate
Final week,T-1d,Schedule event-day posts and brief the team,Social,,,Not started,Posts scheduled
Event day,T-0,Post opening photos and tag exhibitors,Social,,,Not started,Reach
Event day,T-0,Send daily recap email,Email,,,Not started,Open rate
Post-event,T+1d,Send thank-you email with photo link,Email,,,Not started,Open rate
Post-event,T+2d,Send survey,Email,,,Not started,Response rate
Post-event,T+1w,Publish recap article or video,Blog and social,,,Not started,Views
Post-event,T+2w,Send lead lists and sponsor reports,Email,,,Not started,Reports delivered
Post-event,T+4w,Run results review and debrief,Internal,,,Not started,Debrief held
Post-event,T+6w,Open next-edition registration,Email,,,Not started,Waitlist signups
Replace each T-minus label with a real date by counting back from your anchor date. Leave the owner column blank until each person has agreed to the task, because a name typed in without agreement is just another empty promise.
Adapt it to your event type
The template is a trade show baseline, so trim or extend it to match what you run:
- Webinar or workshop: merge the first three phases into one, drop the retargeting row, and send one email a week.
- Conference: add rows for each speaker announcement and for session-level promotion, so every talk gets its own post.
- Trade show or exhibition: add exhibitor recruitment rows well before T-14, a floor plan release, and a second exhibitor co-promotion push at T-4.
Sort the sheet by due date once it is filled in, and filter by owner to give each person a personal checklist. If two tasks land on the same day for the same person, move one of them now, not on the day.
Copy the template, but replace every T-minus label with a real date before you share it.
Put your schedule to work
An effective event marketing schedule comes down to five moves: set a measurable goal and an anchor date, build five pre-event phases, plan event day by the hour, schedule follow-up before the event happens, and give every task an owner, a due date, and a number. The template turns those moves into a sheet you can fill in today.
Start with your anchor date and write the first row. Once the launch tasks have dates, the rest of the schedule falls into place quickly. If trade media is part of your plan, you can publish your press release or event announcement on Exhibition Globe and reach the exhibition and trade show community during the launch and urgency phases.